There has been one project on my list to complete since I started thinking about doing a DIY storage series using empty household containers. I had no idea if I could make the project happen, but I was definitely going to give it a shot. And, I am happy to report that the project was a success.
I think everyone knows by now that we added a kitty to our family last summer: Grizabella. With a new cat comes cat litter. We purchase the cat litter that comes in the large plastic containers and we do not like to throw them away. We have been saving them until we find a recycling station in our new town. But, I was determined to make something with one of them.
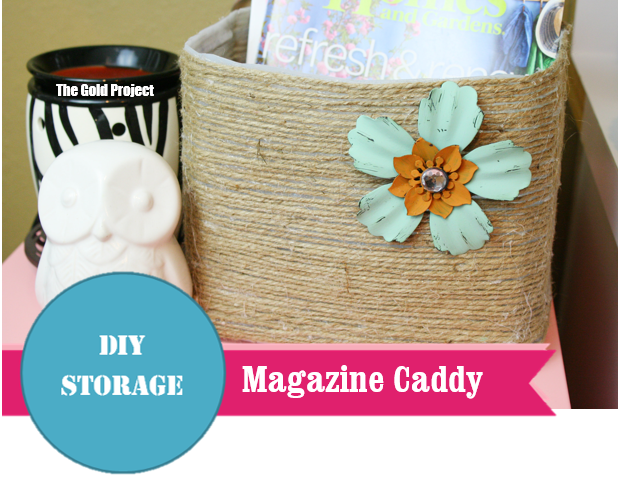
After a little thought, I decided to make a magazine caddy. Honestly, I didn’t really plan on using the caddy after I made it. I was just going to make it to show you guys and then recycle the container. That was until it was finished and I thought it was adorable. Now, it is sitting in my office holding my favorite home and organizing magaines.
I LOVE IT!!! And, it turned out so much better than I had ever imagined.
Enough with the rambling, let’s get to how I accomplished this storage piece.
Step 1: Cut the Top off of the Container
Using a crafting knife, I cut the top portion of the container off. I actually used the ridge at the top of the container as my marker.


Step 2: Apply the Twine
Using twine that I had left over from a previous project and my hot glue gun, I wrapped and applied the twine to the entire container. This was a long and tedious process. It took me approximately 2 hours and about 10 glue sticks to complete. Needless to say, I took a break or two during the process.


Step 3: Trim the Excess/Uneven Plastic
After I finished wrapping and gluing the twine, I noticed that I had a little plastic showing at the top. I guess my cutting wasn’t perfect. So, I trimmed the rest of it using surgical scissors (those things cut anything).
Step 4: Add an Embellisment
After I was finished, I thought the caddy needed a little something extra. It needed some color. So, I purchased a metal flower embellishment from Hobby Lobby for 40% off of $4.99.
Using my hot glue gun, I attached the embellishment to the front of the container.


Step 5: Add Magazines
The last step was to add some magazines and give it a new home, which will be my office.


Check out my other DIY Storage projects below:
Box Tops
Coin Storage
